Wednesday, August 26, 2009

Design Intervention - A Table Ending


This is a semi-makeover since I am calling on your opinions on how to "finish" this makeover ending.
I found this table and its 4 matching chairs on Craigslist for $40. It came with an extra leaf for extra seating so I thought that was a good deal. We desperatly need seating in the breakfast area.


The table was yucky maroon with lovely off-white legs. I think the legs and the curvature on the chairs is what appealed to me.

My original inspiration for the table came from this picture:


So when I started sanding the table, I was so bummed to find out that the top was not wood but plastic! Okay, so obviously now a stained wood top would no longer work. Uh!

Then I knew that we have plans to paint our kitchen cabinets white (hold your breath, some day!) - so I need a bit of contrast in the space. Hence, I decided to paint the table black.

And here is the play-by-play:

Step 1: I first wiped down the table to clean off any dirt, grease and dust.

Step 2: The paint job on the table was horrible. I was peeling it right off. Got lazy and decided to use paint thinner. Paint thinner took forever so I decided to sand right away. I really should have stuck to just peeling the paint off. But I got to use this lovely lady (yes, my tools are feminine):


Step 3: After hours of sanding, I got impatient and decided it was time for the primer. I used a gray primer since I was painting the table a dark color.


Step 4: After priming, I spray painted first with Rustoluem Black - Flat. This was a mistake and it made the table look like charcoal. I then went out and purchased Black semi-gloss paint. The table started to look much better.


Step 5: Finally for durability and protection, (since this will be a high traffic piece of furniture), I used Wipe-On Poly.


Here is the before again:


Here is the after:


Now, I need your help on how this happy ending should play out for this table. As you notice, I left the legs as-is. My husband likes it this way but I am not completely sold. I would like to paint the legs black as well. What do you think?


Second, what should I do with the chairs? Should I paint them all black as well?


You all are so talented and I know I can count on your great ideas.

I am still not completely finished with the top of the table as I have a little bit of "personalizing" to do to make it my own. Here is a sneak peek.

Can you read what it says?

I will be back with hopefully the final reveal of the whole set.

Friday, July 24, 2009

Quick and Simple - Glass Jars


So I was itching for a quickie project because God knows the big projects will take FOREVER to finish and I need a "quick fix" of accomplishment.

As I was about to throw away these glass jars, I heard them cry out to me (insert drama here). "Don't throw us away! You can doll us up and use us again." Hmmm, am I really getting to a point where glass jars are speaking to me?

So I listened to the glass jars, and took their caps to some black spray paint.

I hot-glued some leftover ribbon from another project on the jars

Then I chose a font I like, and printed out labels on cardstock paper (I chose white and brown here to match the ribbon)

And then ugly glass jar, became a pretty-cutey


And the best part of it all, they stopped speaking to me! Don't they look so cute and cozy in this romantic corner in my kitchen? I love them!

Tuesday, July 21, 2009

The Message Board Bed Makeover Reveal


It has been incredibly busy over here at Haute House :) But I finally got around to finishing my first furniture makeover; what I call the Message Board Bed. I have to pat myself on the back for this one because I never thought I have it in me to do a furniture makeover. But I can do it, you certainly most definitely positively can too.

Let's recap.

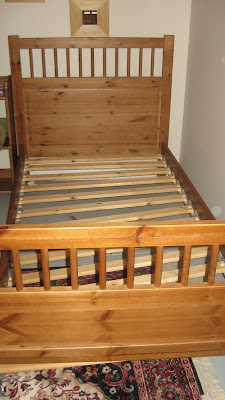
Remember this oh-not-so-interesting dorm room bed?


It has been transformed to this:


Here is how I did it, step by step:

Step 1: Set-up your work area. By then, I had finished the footboard and was moving on to the side base boards.


Step 2: Sand your surface. For the footboard, I had done this manually with a regular sand paper (medium grit). But for the base boards and headboard I decided to do something different, per advice of hubby and used this varnish stripper.
Tip: This stuff is strong! Wear gloves, wear a mask, and use in ventilated area.
Tip: If I had to do this all over again, I would not have used the stripper and sanded manually. In the end, I felt with the mess and clean-up this created, it didn't save much time and effort.


Step 3: Lay on stripper thick as to keep a bubbly surface.


Step 4: You can use brush to spread the application evenly but be careful to not brush it too thin. The directions say to leave on for 30 minutes but this stuff evaporates quickly - so I only left it on for about 5 minutes for it to work through the varnish.

Step 5: Scrap away the varnish (should come off really easy now) with a flat knife.


Step 6: Prime surface. I used white primer here.


Step 7: Spray your surface with chosen paint color. In this case, I used blog land's favorite spray paint of all time, Heirloom White by Rustoleum.


Spray paint away!


For the message footboard, I followed all the same steps above (except manually sanded instead), taped off the inner section and painted it with chalkboard paint. Tip: I would have preferred to use chalkbaord spray paint instead but at the time I couldn't find any at Lowes.

I really need your opinions on what you think of my first furniture makeover. Do I pass as a wanna-be designer?

Thursday, July 9, 2009

Remember...

I call this post "Remember..." since I have started several projects around the house and I am ever-so-slowly doing one thing for each project, here and there. I wanted to show you some progress on some of them.

Remember our basement bathroom remodel? Well, the colors of this decorative pillow really appealed to me so I decided to do a burst of some of these bright colors here and there. I haven't done any of that yet, but I thought to show you the pillow anyways because I think it's just so purdy!

I also decided to switch out the light green bath rug with this brown and beige one.

I still have to put my cream shower curtain here to finish the look.

Remember the light fixture that I purchased? Well it finally went up and made it itself a home to complete the vanity. What do you think?


Remember my great thrift store find, the three black press chairs? Well two of them are sitting pretty in my sunroom...for now at least.

We never got around to finishing painting the sunroom so hence the two random colors.

Moving on...

To the exterior of the house. Our front door looked really worn out and bland. It was a faded color of teal green and not to my liking. So we found some brick red exterior paint and voila. Much better and brighter.

(Side project - still need to spray paint all the gold fixtures and door handles)

And since we are outside, here is my little front porch. It's still a long ways to go before coziness and ice cold lemonades

Sunday, June 28, 2009

Great thrift store find!


I found this black press chair - love it! And I think it's perfect the way it is, no new paint needed or distressing. It's the right amount of distressed :)

What if I told you that I paid $25, for THREE OF THESE? That's right, I got not one, not two, but THREE of these black beauties for only $25 total! If you do the math (or pull out the calculator like me =) ), that's just around $8 a chair! And they are in great sturdy condition. Woohoo!


So the possibilities of how to use them are endless. I could use all three to make a little dining room set for the breakfast area, or use them separately around the house. What would you do?

Furniture Makeover - Part I

As part of the guest bedroom remodel, I decided to give the ugly dorm room twin bed a makeover.

This is my very first furniture makeover and wanted to "practice" on a piece that didn't cost much and in this case, costed NOTHING. We picked this up from a neighbor who was foreclosing on their home and was giving away several items for free. While I am not fond of its bland style (or lack of), I figured this will do for a designer wanna-be on a budget :) And I am just imagining how much nicer this bed will look with new and soft bedding.

So, I am doing this bed makeover in three sections - 1) Footbard 2) Headboard and then 3) the frame sides.

Here is the whole bed before:
Here is the footboard before:

After sanding, priming and spray painting, here is the footboard after:

I decided to do a "message-board" footboard to personalize our welcome for each of our guest. So what you are seeing as the black paint is actually chalkboard paint!

More pictures and a tutorial post to come!

Wednesday, June 17, 2009

I made me a topiary!

I finished my third diy decor on my project list. Remember when I said one project a month? Yeah, right! I am already itching for the next project!

So to recap, here is Kara's version of the topiary: Here is Melissa's version of the topiary:
And here is my version of the topiary:
What do you think? This was super easy! You can get decorations on how to make your own from either Kara's post or Melissa's post or see my directions below.

I actually didn't need to use hot glue as I used the ends of the stem of my fake greenery to puncture the Styrofoam ball.

Materials:
1. Two 6 inch green Styrofoam balls from Michaels. Each one was $4.99 and got to use my 50% off coupon
2. Greenery I already had
3. Planter I already had
4. Spray paint I already had
5. Tree branch - I already had :)
6. Bag of moss ($1 from the Dollar Store)
Total: $8.48!


Directions:
1. I spray painted my planter. It was a light oak color and decided to spray paint it espresso
2. I worked my way around the green Styrofoam with the fake greenery
3. I filled the planter with another Styrofoam ball and covered the top with moss
4. I got a tree branch from my yard, plopped the topiary on it and then stuck it through the base Styrofoam ball inside the planter, and done!

Seriously, this was super easy and idiot proof for people like yours truly. And most importantly, super cheap. So go make yourself a topiary!

Friday, June 5, 2009

My Version of the Jute Wreath

So, I finally got done with one of my projects on my project list. What do you all think? I might change up the hanging ribbon to a lighter shade or try out the burlap like Kimba had on hers.

If you want directions on how to make one (and it's so easy!), Kimba has a tutorial on her blog.

Thursday, June 4, 2009

My Favorite Paint Color

Melissa from 320 Sycamore (one of my favorite blogs by the way) is hosting a My Favorite Paint Color party.

I hope I am not too late in joining, but I had to share my all time favorite paint color: Valspar's Gold 4.

We have used this color twice so far in two of our previously-owned homes. I plan on using the same color again in our family room. Can you tell I love it?! You would think I would be sick of it by now, but...I don't know, it's like the fourth family member that moves with us wherever we go!

I love it. I love its warmth. It's one of those colors that, whether in sunlight or not, still maintains its warmth and brightness. We are definitely in need of major warmth in our current family room. It's open and nothing is bringing it in, so this color will be perfect to get some coziness back.


Happy Paint Party!